
You may already be in the Configuration Wizard screen but if not, navigate to System Settings > Arranging Director Admin > Accounting Integration – QuickBooks Desktop > Configuration Wizard.
- Click Configure Contract Items link.
- You will see all the contract line items. You want to link your FrontRunner (FRP) line items with a line item in Quickbooks (QB). You can also group certain sections together.
Configure Additional Line Items
This section is for any on-the-fly line items that are added to a contract. There are two options:
- You can link the main line item.
- Click Show All to show all the sub-sections in FrontRunner and link each line item.
Configure Discounts
This section is for any discount line item that is added to a contract.
- From Quickbooks, make sure your Discount is setup as Other Charge.
- From FrontRunner, select which Quickbooks account you would like to link it with.
- If you have multiple Discount line items in FrontRunner, you may link each of them up to a different item within Quickbooks.
- Click Update Quickbooks Link button.
- Click your back button (blue icon in the top right).
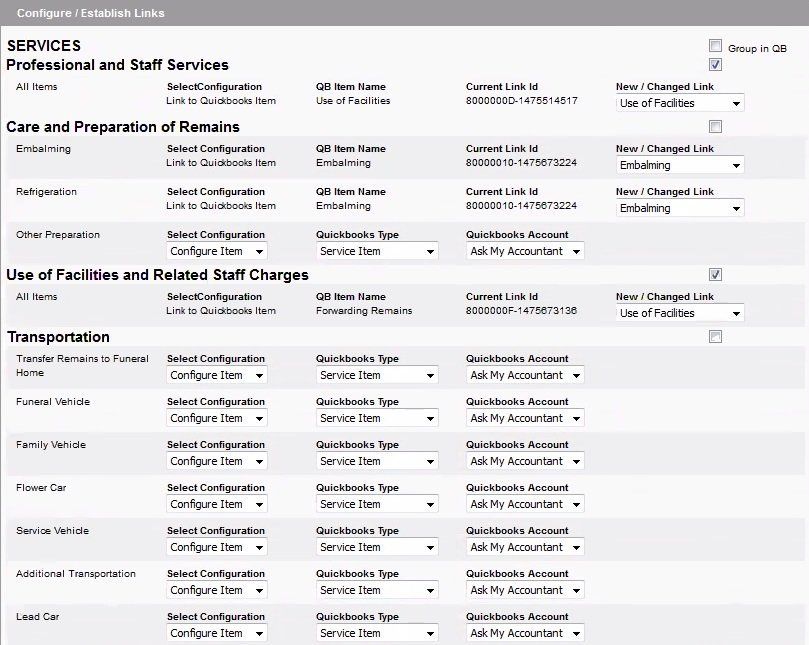
Configure/Establish Links
This section lists each non-product line item in your Arranging Director contract. The configured/relevant services will be pushed when you save a contract.
This section lists each non-product line item in your Arranging Director contract. The configured/relevant services will be pushed when you save a contract.
Each section will allow for two different configuration set ups:
Group Categories
By grouping categories you will be able to link all line items to the same item within QB. When the contract pushes over from FRP, the invoice within QB will only show the item it is linked to. No individual product reporting within QB can be done with this configuration, only general group reporting.
To set this up, click the Group in QB check box that will be on the right hand side of the section header.
Individually Link Items
By individually linking each item to a QB item, the contract information passing through to QB will showcase each line item. This option will give very detailed information in QB.
To set this up:
- For each line item, refer to the Select Configuration drop down’.
- The options are:
- Configure Item – Choose the QuickBooks Type and the corresponding QuickBooks Account number:
- Inventory Item
- Non-Inventory Item (default)
- Service Item
- Other Charge Item
- QuickBooks Link (Recommended Option) – If you do have this product set up in QB, then select this option and select the appropriate Item from the New / Changed Link dropdown. (The QB Item Name and Current Link Id fields will be blank if this is a new link.)
Once all relevant line items have been configured, click on the Update QuickBooks Links button located at the bottom of the list.
Configure Confirmation
Once you are confident that your line items are set up properly, check the box at the top to confirm that your items are setup correct and complete.
Click the blue swirl icon at top right to return to the Configuration Wizard.