
Calendar
Navigate to the photo gallery page on your website. If you require a new page, visit our Pages
page.
Click Edit Content.
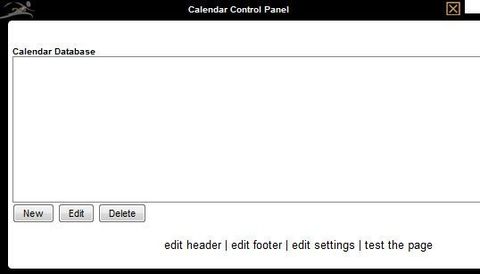
- New – Create a new event.
- Edit – Edit an existing event.
- Delete – Delete an existing event.
- Edit Header- Edit the top portion of the page.
- Edit Footer – Edit the bottom portion of the page.
- Edit Settings – Customize the layout of the calendar.
- Test the Page – View the changes made before saving.
Edit Settings
Calendar Display
Designates the events to be displayed.
- Show all events – All past and future events in the calendar database will display.
- Show all future events – Only events that occur during and after the current month will display. All past events remain in the database (and can be edited and saved as a current event in the future) but are not visible to online visitors.
- Show this month’s events – Only events that occur this month will display. Future and past events will not be visible.
Calendar Style
Determine the layout of the calendar.
- Full calendar – The entire calendar will display.
- Full calendar without weekends – Only weekdays will display, which is useful if your events only occur Monday – Friday.
Add an Event
- Click New.
- Enter the event information within the WYSIWYG editor (white content window).
- Enter the calendar entry information:
- Event Name – Enter a short name for the event that will appear on the calendar.
- Short Description – Enter a short description, which will appear when online visitor mouses over the event name. It is also used in the pop-up when no information is entered in the WYSIWYG editor.
- Start Date, M/D/Y – Use the drop downs to choose the start date, which determines where the event is placed in the calendar.
- End Date, M/D/Y – Use the drop downs to choose the end date, which determines where the event is placed in the calendar.
- The event will display each day from the start date to the end date.
- Start Time, HH:MM – Use the drop downs to choose the start time, which will display with the event and be used for sorting purposes unless the No Start/End option is chosen.
- End Time, HH:MM – Use the drop downs to choose the end time, which will display with the event and be used for sorting purposes unless the No Start/End option is chosen.
- Display Method – This option determines how the calendar event displays.
- No Start/End – No start or end times will display; the event will be listed with no time.
- Start Time Only – The start time will be visible each day the event is shown on the calendar.
- Start Time Once – The start time will only be visible on the first day that the event occurs.
- Start/End Each Day – Both the start and end times will display every day of the event.
- Starts/Ends Once – The start time on the first day and the end time on the last day will display; all other days will not show a start or end time.
- Recurring – Use the drop downs to select how often this event will occur.
- Click Save.
** A calendar month will only display if the month contains an event. Events are listed in chronological order by start date.
This page also allows you to add information to the top portion of the page (typically content introducing the page). Click Edit Header to use the editor.